ultr4rick
2. Setup and first acquisitions
This page takes you from a bare board to your first pulse-echo trace. The commands are for Linux. They were written on Ubuntu; macOS and Windows work for the Python side with the usual changes to paths and serial port names.
What you need
- An Ultr4rick v2 board and a USB cable.
- A transducer (for example a 5 MHz contact probe), and couplant gel for the part you measure. Connect it in one
of two ways:
- Through the SMA edge connectors:
PULSER_OUT(J1) andAFE_IN(J2), joined to the transducer with an SMA tee. This is the simplest setup and doesn’t use the mux (photo below). - Through the mux: on one of the U.FL element connectors 1–8 on the back (U18, U19, U20, U21, U26, U27, U28, U29). On v0 boards, U26–U29 are silkscreened TR4–TR7 by mistake: they are elements 5–8.
- Through the SMA edge connectors:
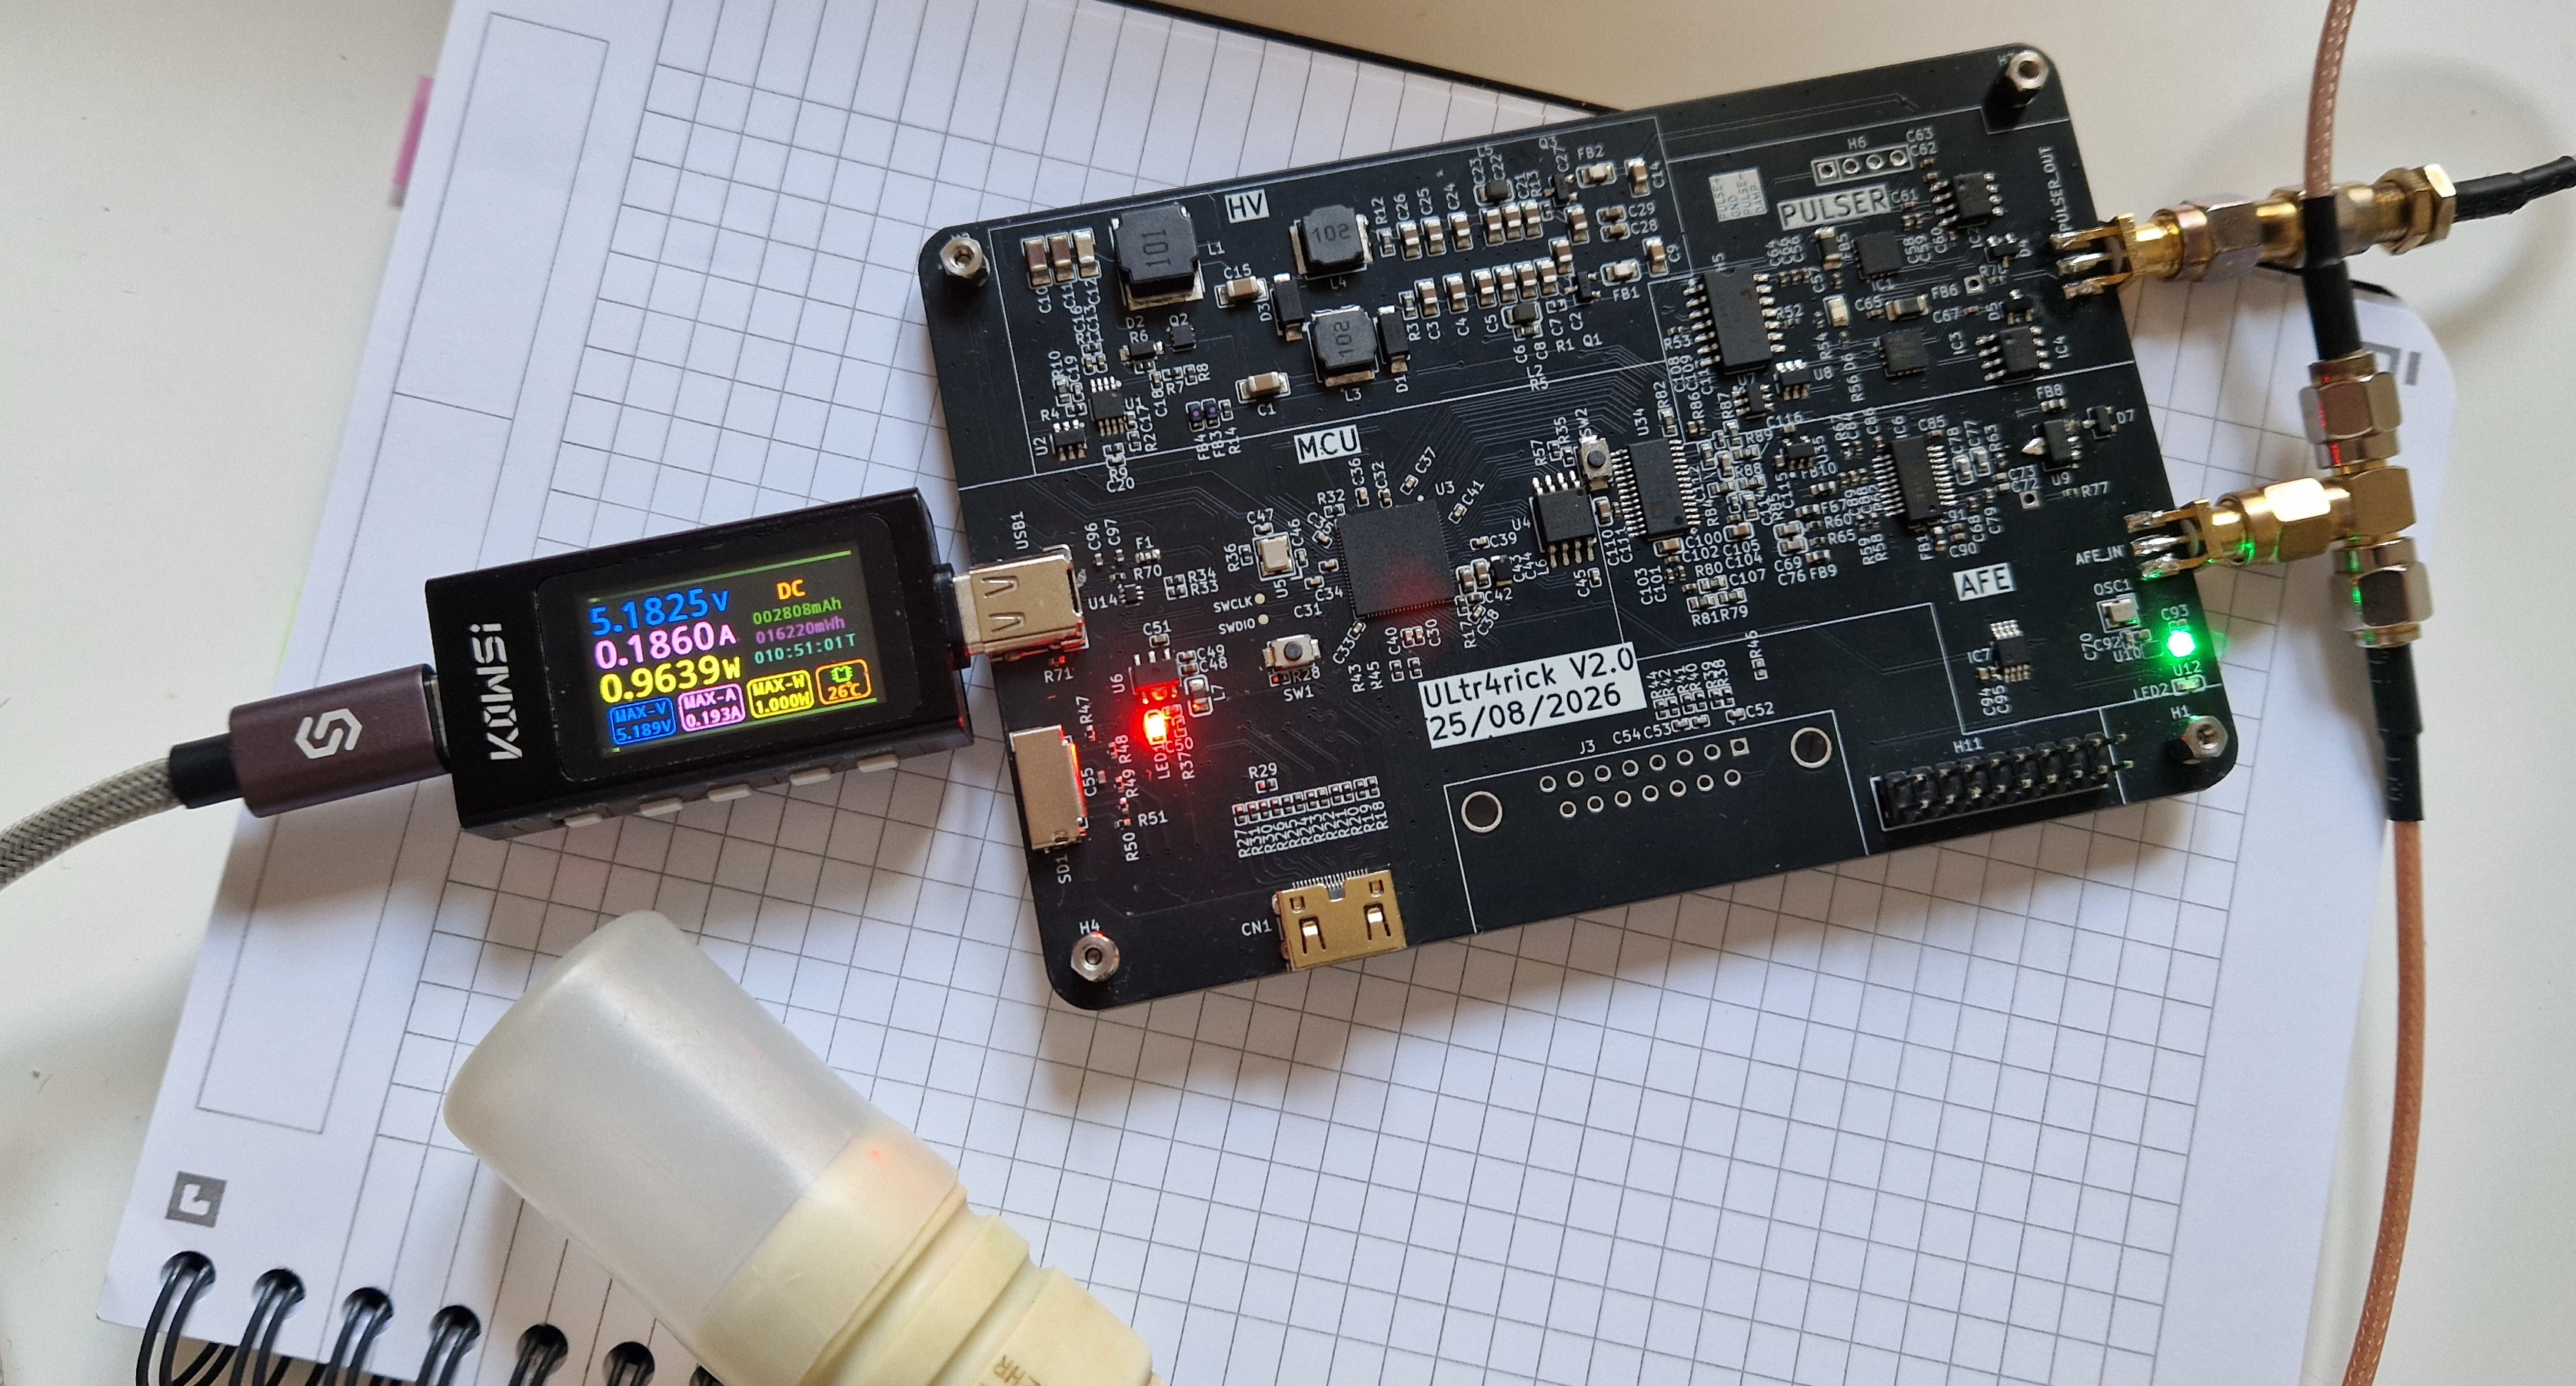
A v0 board running: USB-C power through an inline meter (about 5.2 V, 0.19 A, 0.96 W), and one transducer
connected to PULSER_OUT and AFE_IN through an SMA tee.
- Python 3.10 or newer.
- To build the firmware yourself: the Pico SDK 2.3.0,
arm-none-eabi-gcc, CMake and Ninja.
1. Get the code and the Python environment
git clone <this repo> ultr4rick && cd ultr4rick
python3 -m venv .venv
.venv/bin/pip install -r requirements.txt      # numpy, pyserial, scipy, matplotlib, h5py, jupyter
Run Python from the python/ folder so that import ultr4rick finds the library.
2. Build the firmware
cd firmware
export PICO_SDK_PATH=$HOME/.pico-sdk/sdk/2.3.0
./build.sh -DPICO_TOOLCHAIN_PATH=/usr
-DPICO_TOOLCHAIN_PATH=/usr selects the system arm-none-eabi-gcc; leave it out if the SDK finds your toolchain.
The first build of the DSP image downloads CMSIS-DSP, so it needs network access. You get two images in
firmware/dist/:
| File | Build | USB ID |
|---|---|---|
ultr4rick-v<ver>-ultr4rick-dsp.uf2 |
DSP build (recommended) | cafe:4011 |
ultr4rick-v<ver>-ultr4rick.uf2 |
stdio text console | 2e8a:0009 |
3. Flash it
- Put the board in bootloader mode. Either hold the BOOTSEL button while you plug in USB, or, if it already
runs Ultr4rick firmware, send
reboot-dfuon its serial port (python -c "from ultr4rick.device import Ultr4rick; Ultr4rick().reboot_dfu()"frompython/). - A USB drive called
RP2350appears. Copy the UF2 onto it:cp firmware/dist/ultr4rick-v*-ultr4rick-dsp.uf2 /media/$USER/RP2350/. - The board reboots by itself. Check that it’s there:
lsusb | grep cafe:4011(DSP build).
The status LED goes white while booting, then green when ready.
4. Connect and check the board
From python/:
from ultr4rick.device import Ultr4rick
from ultr4rick import dsp

probe = Ultr4rick(verbose=False)      # finds the board by its USB ID
# Device on /dev/ttyACM0
# Firmware 0.1.16 - library 0.1.14
print(probe.versions())               # ('0.1.16', '0.1.14')
print(probe.status()["raw"])          # ... pulser=disarmed ...
print(dsp.check_selftest(probe.selftest()))
The self-test runs 7 synthetic signals through the on-board DSP and compares the result with SciPy. Each case should pass with a normalised RMS error ≤ 1e-4.
If the port can’t be opened, check that no other program holds it: fuser -v /dev/ttyACM0.
5. First capture, without pulsing
This only listens, so it is safe without a transducer:
import numpy as np, matplotlib.pyplot as plt

probe.read_raw()                         # discard: the first capture after idle has a start transient
raw = probe.read_raw().samples()         # 8000 ADC codes, about 512 at rest
t = np.arange(len(raw)) / 60.0           # µs
plt.plot(t, raw); plt.xlabel("µs"); plt.ylabel("ADC code"); plt.show()
You should see a flat trace around code 512 with a little noise.
Select an element on the mux
Skip this step if your transducer is on the PULSER_OUT / AFE_IN SMA connectors: leave the mux cleared.
For a transducer on a U.FL element connector, choose which element transmits and receives. set_one_mux(k)
connects element k (1..8) to both TX and RX:
probe.set_one_mux(1) # transducer on element 1 (U18): pulse-echo on that element
Other patterns, such as pitch-catch (TX on one element, RX on another), are described in Python library.
6. First pulse-echo capture
This fires the high-voltage pulser. Check the transducer is connected and in contact with the part.
probe.set_gain(100)                                   # receive gain, DAC 0..1023 (50–150 to start)
probe.configure_pulse(96, 6000, 96, "neg-first")      # negative ns, damping ns, positive ns, order
try:
    probe.arm_pulser()
    raw = probe.read_raw().samples().astype(float)    # 8000 raw samples
    env = probe.read_fft().samples()                  # 4096-sample Hilbert envelope
finally:
    probe.disarm_pulser()
    probe.clear_mux()

plt.subplot(211); plt.plot(np.arange(len(raw)) / 60.0, raw); plt.ylabel("raw")
plt.subplot(212); plt.semilogy(np.arange(len(env)) / 60.0, env); plt.ylabel("envelope"); plt.xlabel("µs")
plt.show()
What to expect:
- The excitation appears in the first microsecond, and the receiver is saturated for a few microseconds while the transducer rings down.
- Echoes then come back at regular intervals (for a plate: every
2 × thickness / speed_of_sound). - If the echoes are clipped at codes 0 or 1023, lower the gain. With gain 300 the echoes were saturated on a steel block.
7. Streaming
The DSP build can capture continuously:
probe.stream_start("envelope", 20)       # raw ≤ 100 Hz, envelope ≤ 50 Hz, A-law ≤ 70 Hz
frames = list(probe.stream_frames(20))
print(probe.stream_stop())               # reports how many frames were dropped
A 50 Hz envelope stream is limited by USB and drops frames. Use A-law for high rates.
8. Go further
python/example_dsp.ipynbwalks through every DSP-build feature, including the mux (section 13) and an idle vs. pulsed comparison (section 15).python/example_acquisition.ipynbmeasures the thickness of a stepped steel block.python/example_process.ipynbanalyses saved data without a board.
See 4. Python library for the full API, and 3. Firmware for the command reference.